Homemade sous-vide slow cooker conversion kit
Home made sous-vide bath from a crock-pot
Julia first kindled my interest in a sous-vide cooker in January this year, but I have to be honest, the cost and limited space in my already full kitchen has held me back so far. Nevertheless, after only a little reading of Modernist Cuisine The Art and Science of Cooking, I was convinced I must have one!
Well I still have a space and cost issue, however, if I can prove its worth with the following undertaking, I may still purchase one. To this end I intend to build an experimental PID thermostat to control my Morphy Richards 6.5 litre slow cooker. There are limitations, firstly, I don't know if will even work. Secondly, although the accuracy of the controller is to .1 ° C, I doubt that control of this accuracy can be realised using a slow cooker and finally I won't be using a pump to circulate the water bath. However, for £27 ($41) for the components, compared to £353 ($568) for a new sous-vide cooker, I'm willing to take a chance.
Update June 2015 A similar kit is now available from Amazon (Prime) for £17.99 - Note: the thermocouple is not suitable for liquid immersion.
-
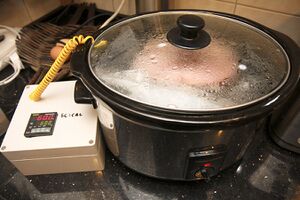 The final version. I'm now perfectly happy with this!
 -
 First trial using cheap steaks, lid removed to show vac-pac hanging system, otherwise known as bamboo skewers!
 -
-
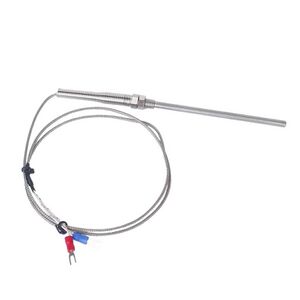 The thermocouple supplied was unsuitable, however a waterproof thermocouple from Amazon.co.uk was £2, delivered!
 -
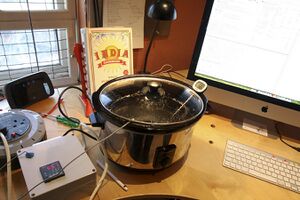 Heath Robinson: Calibrating and testing
 -
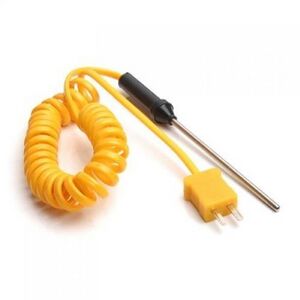 The best thermocouple for this task - see notes


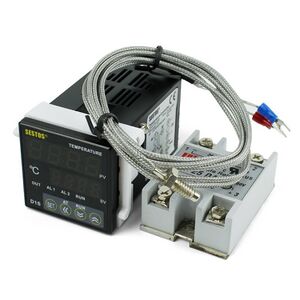
Primary components
- PID controller (£26.99 with free delivery (Amazon Prime)
- Thermocouple (included with above item) - Unsuitable (not waterproof)
- Solid-state relay (included with above item)
I've created this article before even purchasing the above items, let alone building the controller, incase it might be helpful to anyone else attempting to source components for a similar project. I do not intend to create a step by step how to. If you are not able to interconnect the components above without help, you should not be contemplating such an undertaking. Building even a simple project such as this requires knowledge of electrical safety procedures and basic electronics engineering experience.
Do ensure that any exposed metal work is properly earthed!
Progress
I will update this article with the final outcome, be it a success or a failure. If you have any thoughts on this, do please get in touch with me by using Contact the Editor link below.
- Update 1:
- Maybe it will work. I've just seen a commercial version of the kit I'm building (SousVideMagic controller). Quite expensive though at $169!
- Update 2
- The thermocouple supplied with the Amazon controller is unsuitable as it is not waterproof. The screening is stainless steel braiding covering heat-resistant braid (fibreglass?). Neither materials are the least bit waterproof and water ingress to the thermocouple would be immediate.
- A waterproof thermocouple is available from Amazon for under £4: ( K Type 20cm Probe Thermocouple Temperature Measurement Sensor 0.63M Amazon uk). Seems to be innacurate and requires recalibrating every time the unit is used. I notice afterwards that it is sold with a temperature range of -100°C to 1250°C so it's probably not going to be accurate to a few degrees.
- Update 3
- I've assembled a prototype which appears works in theory, but the manual provided is absolutely hopeless and it was starting to look as though it would be impossible to set the PID controller from the information at hand. After much experimenting, I managed to get it working. See below.
Setup and testing
This is what I did and it seemed to work:
- Ensure PID is set to factory settings
- Press SET for 2 secs and cycle through keys checking the values are as shown in the Sestos manual.
- Using digital thermometer compare readings between thermometer and PID display
- If comparison is out then apply temperature correction offset to KEY
SC(sensor calibration) to correct
- If comparison is out then apply temperature correction offset to KEY
- Run Auto Adjustment by pressing
ATfor 2 seconds. It may take from a few minutes to a few hours to complete AUto Adjustment.- If Auto Adjustment does not commence, KEY
CtrLneeds to be set to 2. Once Auto Adjustment has completed KEYCrtLwill be set back to 3 (normal use).
- If Auto Adjustment does not commence, KEY
I ran Auto Adjustment with temperature controller set to 55° C and a heat source connected to the output. I'm not sure if that is required or not.
You should now be ready to test the setup.
Setting the required temperature
To set the PID temperature threshold, just adjust using the arrow keys. Key << allows you to move the decimal point to enable setting to be quickly adjusted by incremeting in 1's 10's etc.
As far as I can acertain, providing KEY run is set to 1 (automatic) the PID will automatically switch the solid state relay output on and off to allow temperature regulation of the heating device; a slow cooker in my case.
Choosing the correct thermocouple
The thermocouple that came with the PID unit was unsuitable as it was not waterproof and my chosen replacement was wildly inaccurate, probably because its operating range was so large (-100°C to 1250°C Probe 1M). Now to find a more accurate waterproof thermocouple.
- Ordered: http://www.amazon.co.uk/Digital-K-Type-Thermocouple-Thermometer-Temperature/dp/B0093DR3LE/ref=sr_1_8?ie=UTF8&qid=1423387750&sr=8-8&keywords=thermocouple (Digital K-Type Thermocouple Probe Thermometer, Temperature Range: -50 to 300°C)
- When connecting up the above thermocouple, test readings were about 150° above actual temperature, however, once I disconnected the (power?) link between 4 and 5 on the PID controller the readings were accurate once I had adjusted the offset by 1.5°. Not sure what this does but it seems to be ok from all of the tests I've run.
Flashing error code orAL
This morning (after not using the controller for 1 month), when powering it on it displayed flashing error orAL. I couldn't find a definitive reason for the code so using the Sestos PID controller manual I compared the controller settings against the manual default settings, they were wildly out. I couldn't see a factory reset option so I sat down and reset all the values to the defaults. Very tedious. After powering cycling the controller, it still showed orAL. However once I put the thermocouple into hot water and set the temperature, the error code stopped and the unit is not working fine. Don't forget to calibrate the controller after you do this.
Useful resources
- Sestos PID controller manual.pdf
- Auber instruments PID controller manual.pdf - A similar product with an English manual
- Has anyone had a Sestos PID controller working ? brewing forum
- Forum post querying Sestos PID
- How do I set up a Sestos D1S temperature controller?
- An excellent article by someone who has completed a similar project from wwwlindens.nu
See also
- Sous vide cooking
- Category:Sous vide recipes
- Sous vide cooking times
- How to cook sous vide meat to different levels of doneness
- Safe minimum cooking temperatures
- SousVide Supreme sous vide cooker
- Anova Standalone sous-vide water heater and circulator
- Home made sous-vide slow cooker conversion kit
- Vacuum sealer (generic)
- Andrew James Professional Quality Vacuum Food Sealer Machine
- Vacuum sealed containers
- Andrew James 8.5 Litre Professional Sous Vide Water Bath Cooker
- Burton Sous Vide Water Bath
- Can the Crockpot Slow cooker and Multi cooker be used as a sous vide bath?